Battery switch on travel trailer function is crucial for managing your RV’s power. Understanding how this simple yet vital component works can save you headaches (and potentially a dead battery!) down the road. This guide covers everything from the different types of switches available and how to safely connect and disconnect your batteries, to troubleshooting common issues and performing essential maintenance.
We’ll demystify the electrical system of your travel trailer and empower you to keep your power flowing smoothly.
We’ll explore the various types of battery switches, their internal workings, and the importance of safe connection and disconnection procedures. We’ll also cover troubleshooting common problems, preventative maintenance, and how to choose the right switch for your setup. By the end, you’ll be a battery switch expert!
Understanding Battery Switch Functionality in Travel Trailers
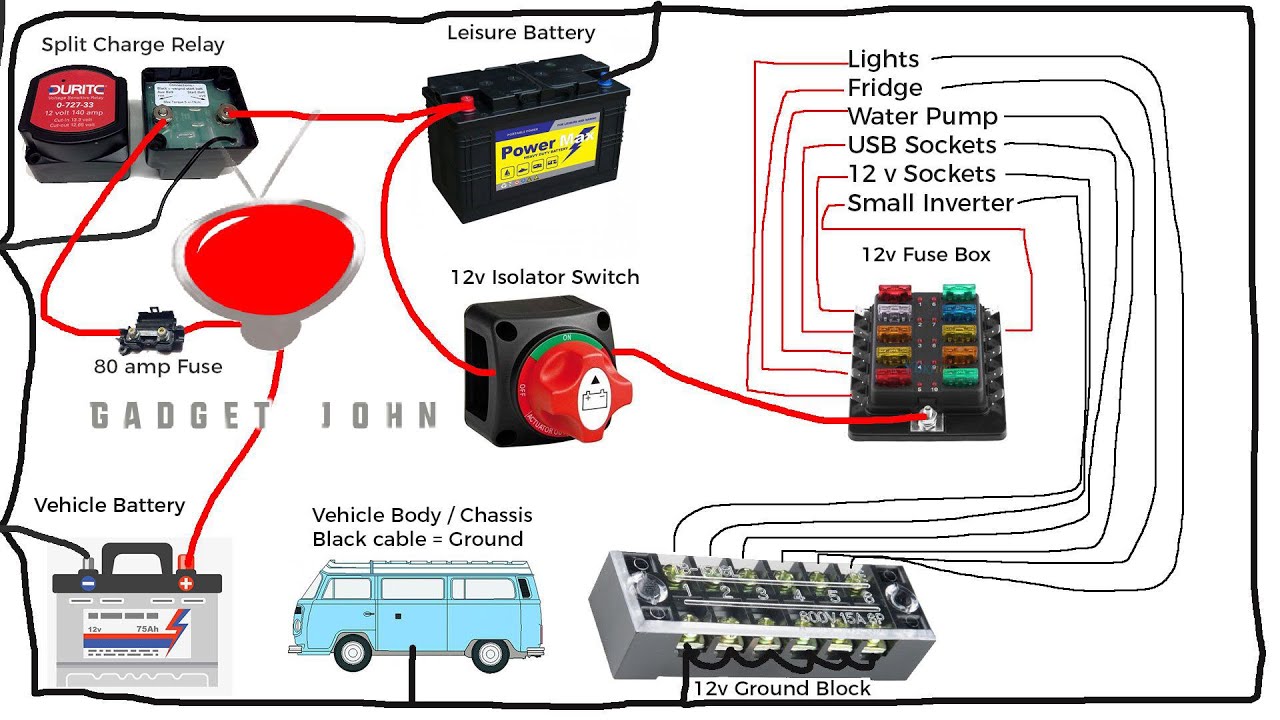
A battery switch is a crucial component in your travel trailer’s electrical system, allowing you to manage power from your house batteries and potentially from your tow vehicle. Understanding its function and operation is key to preventing electrical issues and ensuring a smooth camping experience.
The primary purpose of a battery switch is to control the flow of electricity between your trailer’s batteries and the various electrical appliances and systems. This allows you to selectively use one battery, both batteries, or disconnect them entirely to prevent parasitic drain when the trailer isn’t in use. Properly managing your batteries using the switch extends their lifespan and avoids costly replacements.
Types of Battery Switches
Travel trailers commonly use two main types of battery switches: 1-2-both-off and 1-2-off. The 1-2-both-off switch provides more control, allowing you to use battery 1, battery 2, both batteries simultaneously, or disconnect both entirely. The 1-2-off switch offers the option of using either battery 1 or battery 2 individually, or turning both off. Choosing the right type depends on your specific needs and setup.
A 1-2-both-off switch offers greater flexibility but adds a slight increase in complexity.
Internal Components and Workings of a Typical Battery Switch
A typical battery switch is essentially a multi-position rotary switch with internal contacts. These contacts connect and disconnect the battery terminals based on the switch’s position. The switch housing is typically made of durable plastic or metal to protect the internal components from the elements. The switch mechanism itself uses a series of precisely aligned contacts to ensure reliable connections and prevent arcing or short circuits.
The switch is designed to handle the relatively high current draw of typical trailer appliances without overheating or malfunctioning. A well-maintained battery switch is critical for safe and reliable operation of your trailer’s electrical system.
Typical Wiring Connections of a Battery Switch
The following table illustrates a typical wiring configuration for a 1-2-both-off battery switch in a travel trailer. Note that specific wiring may vary depending on the manufacturer and your trailer’s electrical system. Always consult your trailer’s wiring diagram before making any modifications.
| Component | Function |
|---|---|
| Battery 1 (+) Terminal | Connects to the positive (+) terminal of the first house battery. |
| Battery 1 (-) Terminal | Connects to the negative (-) terminal of the first house battery. |
| Battery 2 (+) Terminal | Connects to the positive (+) terminal of the second house battery. |
| Battery 2 (-) Terminal | Connects to the negative (-) terminal of the second house battery. |
| Load (+) Terminal | Connects to the positive (+) side of your trailer’s main power distribution panel. |
| Load (-) Terminal | Connects to the negative (-) side of your trailer’s main power distribution panel (often ground). |
| Switch Positions (1, 2, Both, Off) | Controls the connection of the batteries to the load based on the selected position. |
Connecting and Disconnecting Batteries
Connecting and disconnecting your travel trailer’s batteries using a battery switch is a crucial task for maintaining your power system and ensuring safety. Doing it correctly prevents damage to your batteries, the switch itself, and even yourself. This section will walk you through the process step-by-step.Properly connecting and disconnecting your batteries is vital for preventing accidental short circuits and ensuring the longevity of your battery bank.
A short circuit can cause significant damage, potentially leading to fire or injury. Therefore, following safety procedures is paramount.
So, you’re an audiophile who travels? Awesome! Check out this guide on audiophile travel setups for tips on packing your gear. It’s crucial to protect your precious headphones and portable DAC, right? Then, once you’ve got your travel setup sorted, consider how you’ll actually listen while you’re on the go. Maybe explore some audiophile travel setups specifically designed for outdoor adventures – think noise isolation and durable cases.
That way, your music will always sound amazing, no matter where your journey takes you.
Safe Battery Connection and Disconnection Procedure
Before you begin, make sure the battery switch is in the “OFF” position. This prevents any accidental connections. Next, locate your batteries and the battery switch. They are typically located in a designated compartment, often near the tongue of the trailer.
- Turn off all loads: Ensure that all appliances and electronics connected to your battery system are switched off. This minimizes the risk of sparks or damage during the connection/disconnection process.
- Wear appropriate safety gear: Safety glasses and gloves are recommended to protect your eyes and hands from potential acid splashes or other hazards.
- Clean battery terminals: Use a wire brush or terminal cleaner to remove any corrosion or dirt from the battery terminals. Clean terminals ensure a good connection.
- Connect/Disconnect the batteries: Carefully connect or disconnect the cables to the battery switch, ensuring positive (+) to positive (+) and negative (-) to negative (-). Never connect positive to negative! Pay attention to the switch’s markings indicating which terminals correspond to each battery. The process is usually similar whether connecting or disconnecting.
- Secure connections: Once connected, ensure all cable clamps are tightly secured. Loose connections can lead to overheating and potential damage.
- Switch on/off: After connecting, move the battery switch to the “ON” position to activate the system. To disconnect, move the switch to the “OFF” position.
Safety Precautions to Prevent Sparks or Short Circuits
Preventing sparks and short circuits during battery handling is essential for safety. A short circuit can generate intense heat, potentially causing a fire or explosion.
So, you’re an audiophile who travels? Awesome! Check out this guide on creating the perfect audiophile travel setup for amazing sound on the go. It’s all about packing light but smart, prioritizing quality over quantity. Then, once you’ve mastered that, explore some advanced techniques by looking at this other resource on audiophile travel setups – it delves into more specialized equipment and techniques for achieving truly exceptional sound quality even in less-than-ideal listening environments.
Remember, good sound shouldn’t be confined to your home!
- Always disconnect the negative (-) terminal first: This minimizes the risk of accidental short circuits when working on the battery system.
- Avoid touching metal parts while connecting/disconnecting: This prevents accidental short circuits and potential electric shock.
- Keep tools and metal objects away from battery terminals: Accidental contact can lead to a short circuit and potentially serious consequences.
- Never work on batteries in a confined or poorly ventilated space: Battery gases can be hazardous. Work in a well-ventilated area to prevent accumulation of flammable gases.
Correct Battery Terminal Alignment
Incorrect alignment of battery terminals can lead to damage to the battery and its connections. Always ensure positive (+) to positive (+) and negative (-) to negative (-) connections. Reversed polarity can cause irreparable damage to your batteries and onboard electronics. The switch itself may also be damaged.
Battery Switch and Connection Inspection Checklist
Regular inspection is vital for ensuring the safety and functionality of your battery system. Before each use, perform the following checks:
- Visually inspect the battery switch for any signs of damage, loose connections, or corrosion.
- Check the tightness of all cable clamps on the battery terminals and the battery switch.
- Examine the battery terminals for corrosion. Clean them if necessary.
- Verify that the positive (+) and negative (-) cables are correctly connected to the battery switch and batteries.
- Test the battery switch operation to ensure it switches on and off correctly.
Troubleshooting Common Battery Switch Issues
Dealing with a malfunctioning battery switch in your travel trailer can be frustrating, but with a systematic approach, you can often pinpoint and fix the problem. Understanding the common causes and troubleshooting steps will help get you back on the road quickly. This section will guide you through diagnosing and resolving some of the most frequent issues.
Common Battery Switch Problems and Diagnoses
Several issues can arise with your travel trailer’s battery switch, leading to a lack of power or other malfunctions. These problems often stem from simple issues like blown fuses or loose connections, but can also indicate more serious electrical problems. Proper diagnosis is key to effective repair.
Diagnosing Battery Switch Problems
Before attempting any repairs, always disconnect the negative terminal of your battery to prevent accidental shocks. Systematic troubleshooting is crucial. Start with the simplest checks and proceed to more complex investigations if necessary. A multimeter is an invaluable tool for this process.
Troubleshooting Steps
| Step | Expected Outcome | Potential Solutions | Next Step if Problem Persists |
|---|---|---|---|
| Check the Battery Switch itself for obvious damage (loose wires, corrosion, broken parts). | Switch appears undamaged and securely connected. | Tighten loose connections, clean corrosion with a wire brush and baking soda solution. Replace damaged parts if necessary. | Check Fuses |
| Check the fuses associated with the battery switch. These are usually located near the switch itself or in a fuse box. | Fuses are intact (not blown). | Replace blown fuses with fuses of the correct amperage rating. | Check Battery Voltage |
| Use a multimeter to check the voltage at the battery terminals. | Battery voltage is within the normal range (typically 12.6V for a fully charged 12V battery). | Charge the batteries if the voltage is low. | Check Wiring and Connections |
| Inspect all wiring and connections related to the battery switch for any damage, corrosion, or loose connections. Pay close attention to the connections at both the battery and the switch. | Wiring and connections are secure and undamaged. | Tighten loose connections, repair or replace damaged wiring. | Check the Battery Switch itself for Internal Failure. |
| If all previous checks are fine, the battery switch itself may have failed internally. This often requires replacement. | The switch functions correctly after replacement. | Replace the battery switch with a new one of the same type and rating. | Consult a professional electrician. |
Resolving Common Issues
Once you’ve identified the problem, the solution is usually straightforward. Replacing blown fuses is simple, and tightening loose connections or cleaning corrosion is typically easy. If the battery switch itself is faulty, replacing it is often the most effective solution. Remember always to disconnect the negative battery terminal before working on any electrical components. If you’re unsure about any step, consulting a qualified RV technician is always recommended.
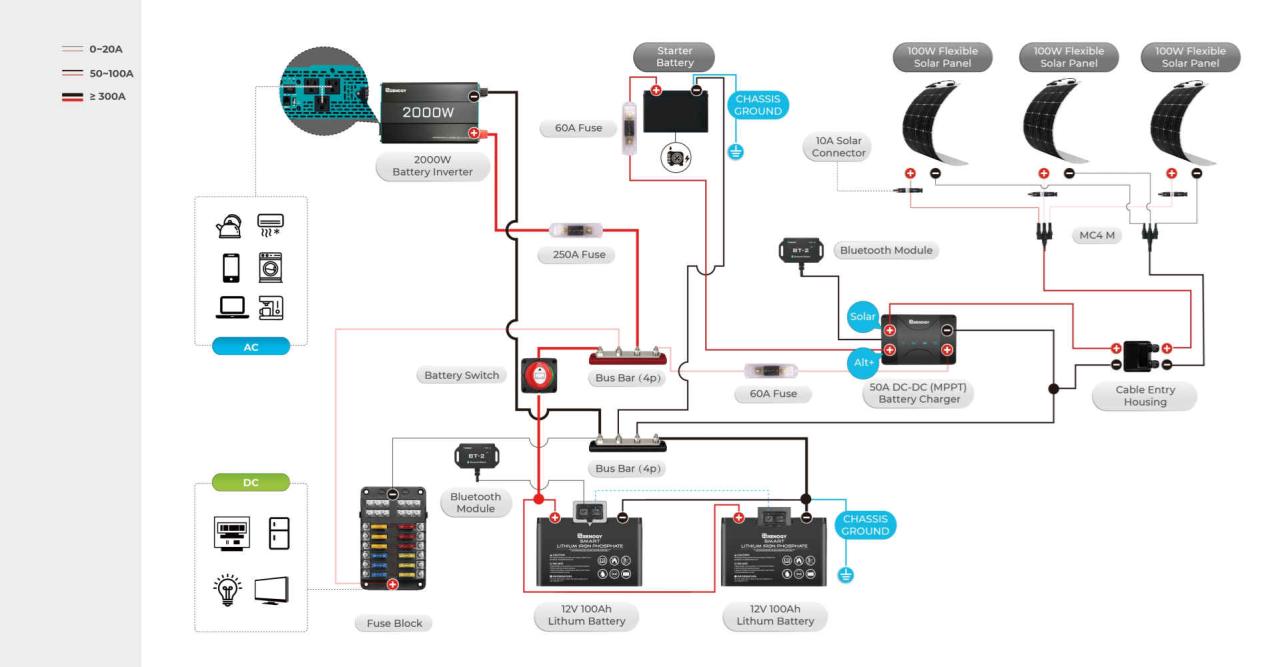
Battery Switch and Power Management Systems: Battery Switch On Travel Trailer Function
A battery switch is a crucial component in a travel trailer’s electrical system, but its effectiveness is significantly impacted by the overall power management system in place. Understanding how these systems interact is key to optimizing your trailer’s power usage and preventing problems. This section will explore different power management setups and how they work with battery switches.Different power management systems offer varying levels of sophistication and control over your travel trailer’s power.
Simple systems rely solely on a battery switch and a basic charge controller for solar panels (if equipped). More advanced systems incorporate automatic charging relays, battery monitors, and even smart controllers that prioritize power sources and manage energy distribution intelligently.
Power Management System Comparisons, Battery switch on travel trailer function
A basic system might consist only of a battery switch to select between shore power, generator power, and the house batteries. More complex systems integrate a charge controller to manage solar input, an inverter to convert DC power to AC, and a battery monitor to display the state of charge of your batteries. These advanced systems often include features like automatic switching between power sources, prioritizing solar power when available, and preventing overcharging or deep discharging of the batteries.
For instance, a sophisticated system might automatically switch to solar charging during the day, then switch to shore power at night if connected to a campsite. Without such a system, you would manually manage these transitions using the battery switch and separate control panels.
Interaction of Battery Switches with Solar Panels and Inverters
The battery switch acts as the gatekeeper for the house batteries. Solar panels, through a charge controller, feed power directly into the batteries. The battery switch doesn’t control the flow of power
- from* the solar panels to the batteries; that’s the charge controller’s job. However, the switch
- does* control the power
- from* the batteries to the rest of the trailer. Similarly, an inverter draws power from the batteries to create AC power. Again, the battery switch controls the flow of DC power
- from* the batteries to the inverter, but not the AC power
- from* the inverter to the appliances. This means you can have solar charging your batteries while simultaneously running appliances powered by the inverter, as long as the battery switch is in the correct position.
Battery Switch Role in Preventing Battery Drain
A correctly used battery switch is essential for preventing battery drain when your travel trailer is not in use. By switching the batteries to the “off” position, you isolate them from any potential parasitic drains in the trailer’s wiring, preventing slow discharge over time. Even small drains, like a clock or a carbon monoxide detector, can eventually deplete your batteries if left connected.
This is especially crucial during periods of extended storage.
Selecting an Appropriate Battery Switch
Choosing the right battery switch depends on the size and configuration of your battery bank. Consider the number of batteries (two, three, or more) and their amperage. A switch rated for the combined amperage of your batteries is essential. For instance, if you have two 100 amp-hour batteries, you’ll need a switch rated for at least 200 amps.
Also, consider whether you need a switch with additional features, such as a “disconnect” position to completely isolate the batteries, or a “combination” switch that allows switching between different power sources and battery banks. Always check the manufacturer’s specifications to ensure compatibility with your system’s voltage (typically 12V in travel trailers).
Mastering your travel trailer’s battery switch is key to a smooth and enjoyable RV experience. By following the safety precautions and maintenance tips Artikeld here, you can prevent costly repairs and ensure reliable power whenever you hit the road. Remember, understanding your system is the first step to trouble-free adventures. So, get out there and enjoy the open road, knowing you’ve got your power under control!
Q&A
What happens if I accidentally connect the battery terminals incorrectly?
Connecting battery terminals incorrectly can cause sparks, damage to the battery or switch, and potentially create a fire hazard. Always double-check the positive (+) and negative (-) terminals before connecting.
How often should I inspect my battery switch and connections?
Inspect your battery switch and connections before each trip and at least once a month, looking for corrosion, loose connections, or damage.
My battery switch is making a clicking sound. What’s wrong?
A clicking sound often indicates a faulty switch or a low battery voltage. Check your battery voltage and consider replacing the switch if the problem persists.
Can I use a battery switch with a solar panel setup?
Yes, but you’ll need to ensure your switch is compatible with the amperage of your solar panel system. Consult your solar panel and switch manuals for compatibility information.
